

How To Add Animation To Powerpoint Text
Accept yous e'er wondered how to create burning (or flaming) text backgrounds?
In this tutorial, you'll learn how to use PowerPoint animations to liven up any text (or other object) with a simple moving background outcome similar you lot can run across below.
You'll learn how to create a video, motion-picture show and shine motion background using these blitheness techniques.
ARTICLE GIVEAWAY: Click here to go the working files so you can create ain movement and fire text and follow along with this tutorial.
The basic rundown of this motion background text result is this:
- You cut your text out of a solid rectangle
- Y'all run your moving background behind the cut out pieces (to create the blithe text effect)
With that general framework downwards, here is how to do it.
1. Insert your solid shape
First make a shape with the text that you lot want to put in. I'll keep information technology simple and first with a rectangle, so I'll go toInsert->Shapes, choose the rectangle, then draw information technology across the slide. The result should expect like rectangle with 3 stripes in the figure to the right below. 
2. Add together your text
Now we need to add the text that volition be cut out, and so I'll merely write the word TEXT here equally an example. Make sure you use a dainty, fat, bold font for best results – I'll employ Arial Black in this case.  Ok now we can either add an outline to the messages or not. I'll become ahead and add one every bit a sit-in by correct clicking the text, and then going to Format Text Effects, then under Text Options, going to Text Fill on the left and scrolling downwards and making the text outline solid, white, at 3 points in width to make it nice and visible. I've likewise temporarily made the text fill up darker so you can see the outline ameliorate.
 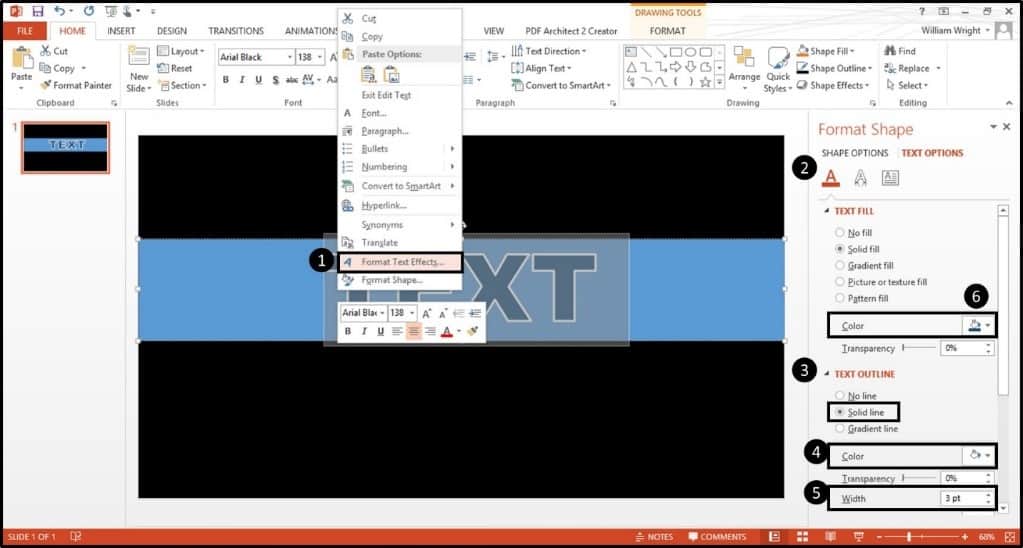 At present the text fill will be cut out for our mask, so while I made it dark here, I recommend that you brand that color close to the text outline color, and then much lighter. This is because when you cutting out the text fill (which nosotros'll do in a niggling bit), small bits of the fill colour will however remain at the edge – see beneath what I mean when the nighttime blue text fill is used. >
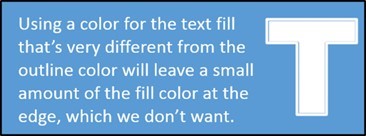 Therefore, by making the make full close to the outline color, we'll make this edge barely noticeable, then let's change the dark blueish to a yellow text fill – still under the text fill menu.
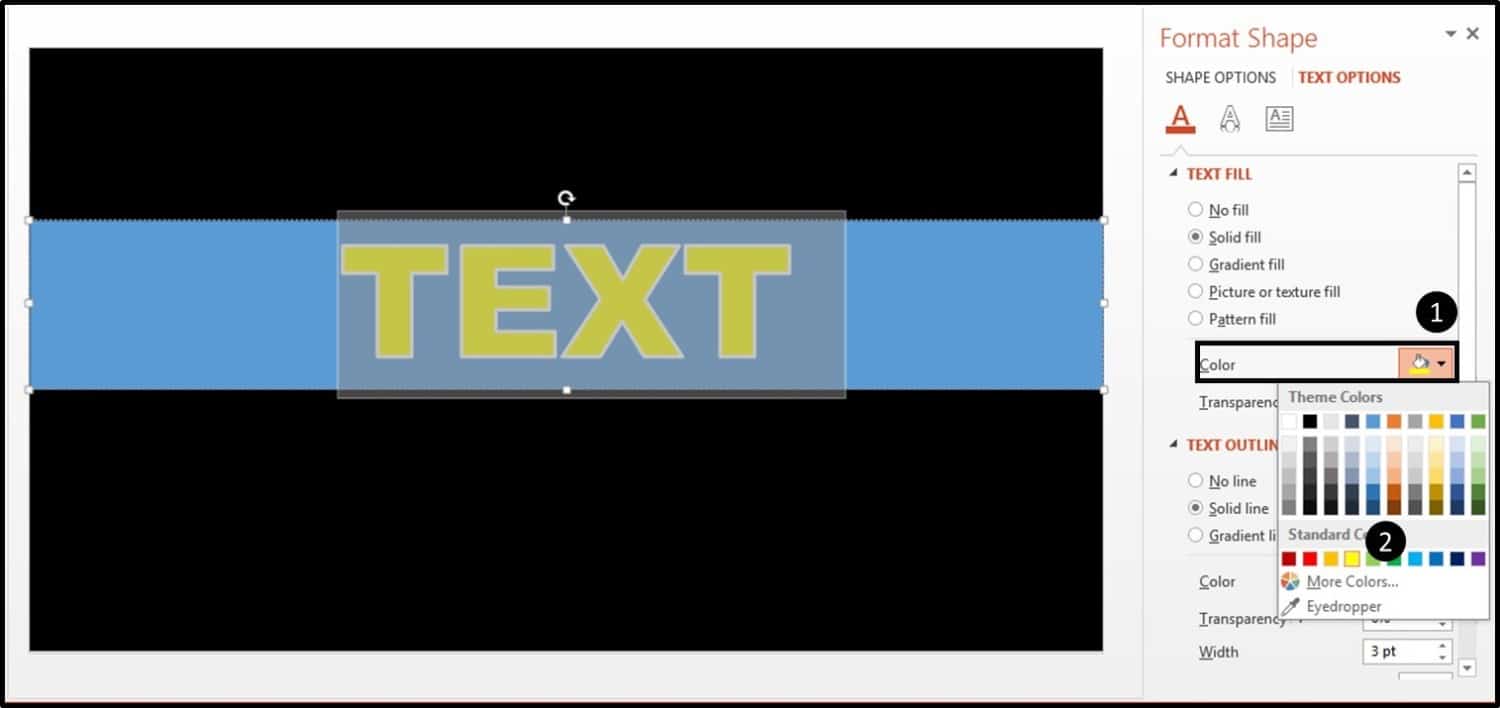
iii. Hibernate your mask
At present to hide the rectangle, let's make the shape fill (the blue colour) the same equally our background (black), and take out the rectangle shape outline. So still under the Format Shape menu, nosotros get to Shape Options, then Make full on the very left, make it a solid black fill up, and choose "no line" for the outline. 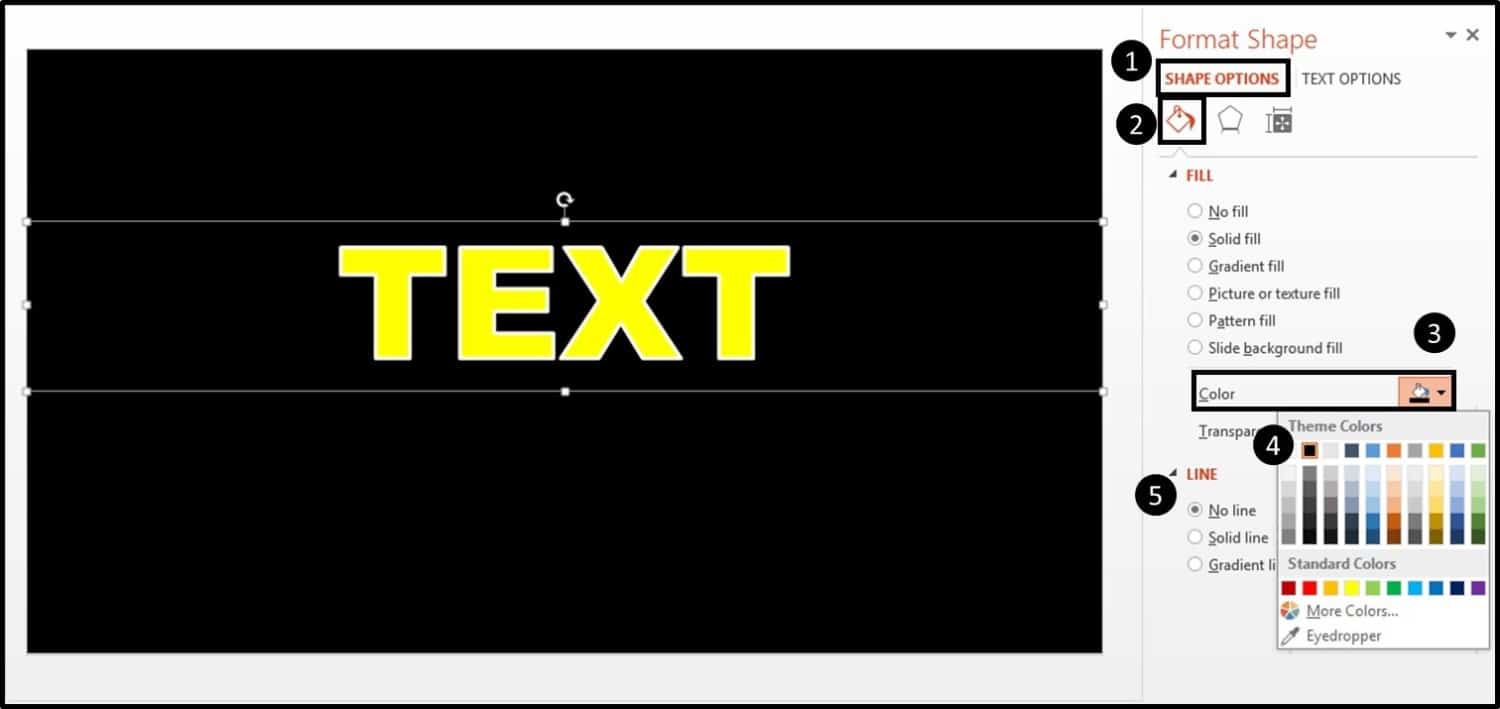 Ok now we accept our mask built, and we've come up to the fun part.
4. Paste your mask as a picture
Let's cut the mask (CTRL + X on a PC) and when we paste, paste as a motion-picture show by right clicking, going to Paste, and choosing the picture show choice. Alternatively (and especially if you have an earlier version of PowerPoint), you can paste as a picture by going to the Dwelling house tab, and so choosing Paste on the left, striking Paste Special, and choosing 1 of the motion picture formats from the list, equally shown in the graphic beneath. 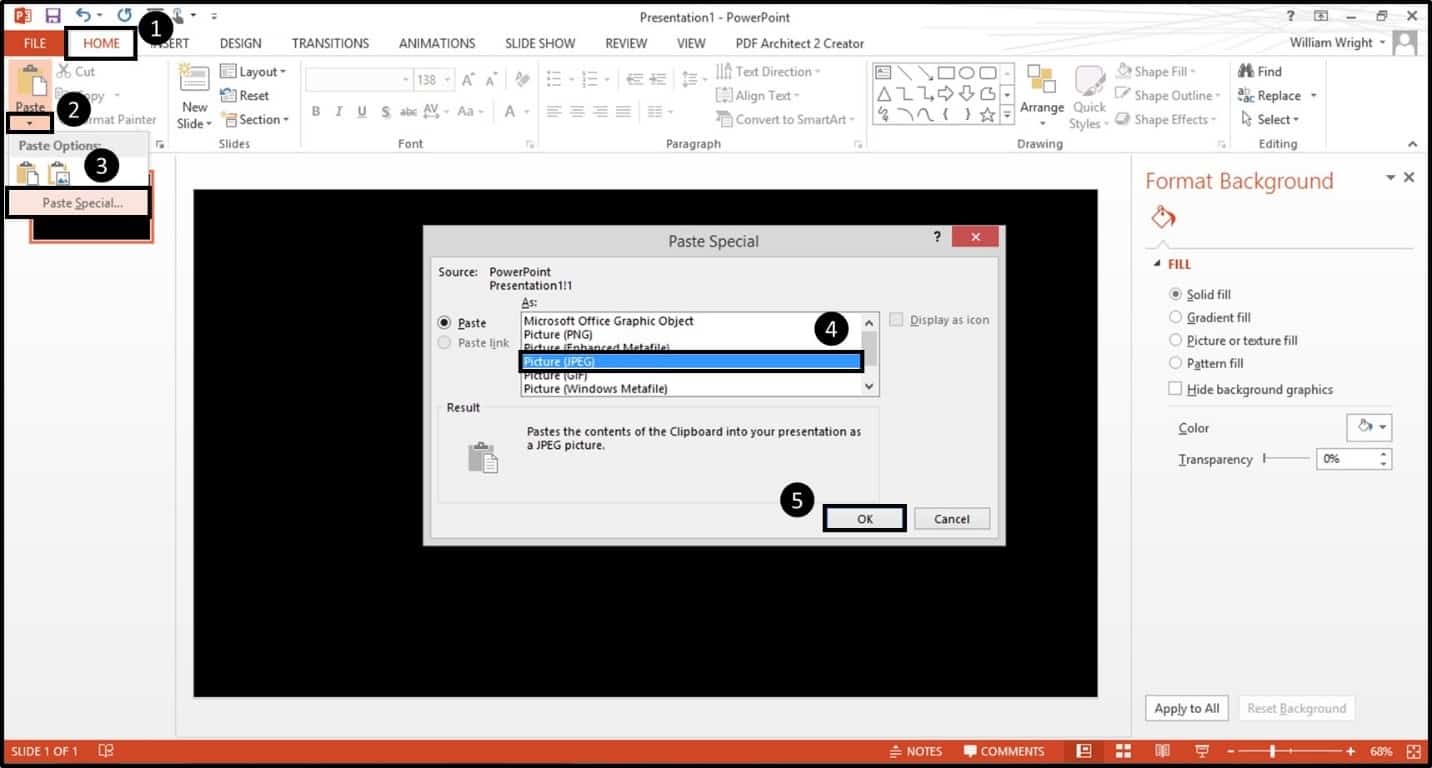 At present that we have our mask picture pasted, we go toFormat,Color, andFix Transparent Color.
 ![]() And we click anywhere on the yellowish text fill with the wand – and there you get! The yellow part is now gone and the mask has a cutting-out in the shape of the text, which y'all can see if I elevate the text off the slide.
And we click anywhere on the yellowish text fill with the wand – and there you get! The yellow part is now gone and the mask has a cutting-out in the shape of the text, which y'all can see if I elevate the text off the slide. 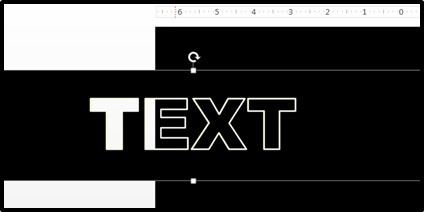
Nosotros're at present set to brand our background. For this you accept several options: 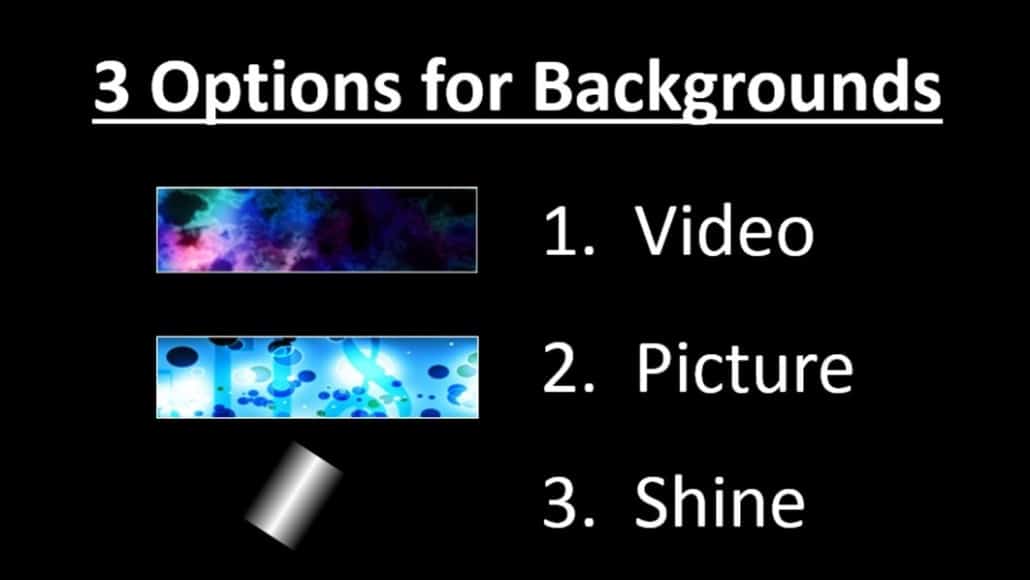 ul class="">
- The offset option which is my favorite, is to embed a video, although it but works on PowerPoint 2010 and afterwards. Move Backgrounds For Costless is a really expert site for gratis motion video backgrounds that I used in this tutorial, every bit everything is costless to use for whatever projection (none of the confusing licensing linguistic communication!). You just take to quickly annals with your email.
- Fifty-fifty though the video option is my favorite, if you have an earlier version of PowerPoint, you can notwithstanding create a really smashing effect using a flick and making information technology move. I like using Stock Photos For Free (from the same folks as the video site).
- And finally you can create a shine effect to your text. And this involves creating a thick rectangle with a gradient.
Let me just apace bear witness you lot how to make the shine upshot before nosotros move to the blitheness pace. Allow'southward showtime with making a vertical rectangle so adding a gradient fill. So right click and get to Format Shape, then Fill on the left, then give it a gradient make full, choose Linear, make information technology 180 degrees, and adjust the slope stops at the bottom. Note: Make sure there are three of them and color the ones on the sides white with a 100% transparency. Color the one in the heart white equally well, merely go out the transparency at 0% for that one. 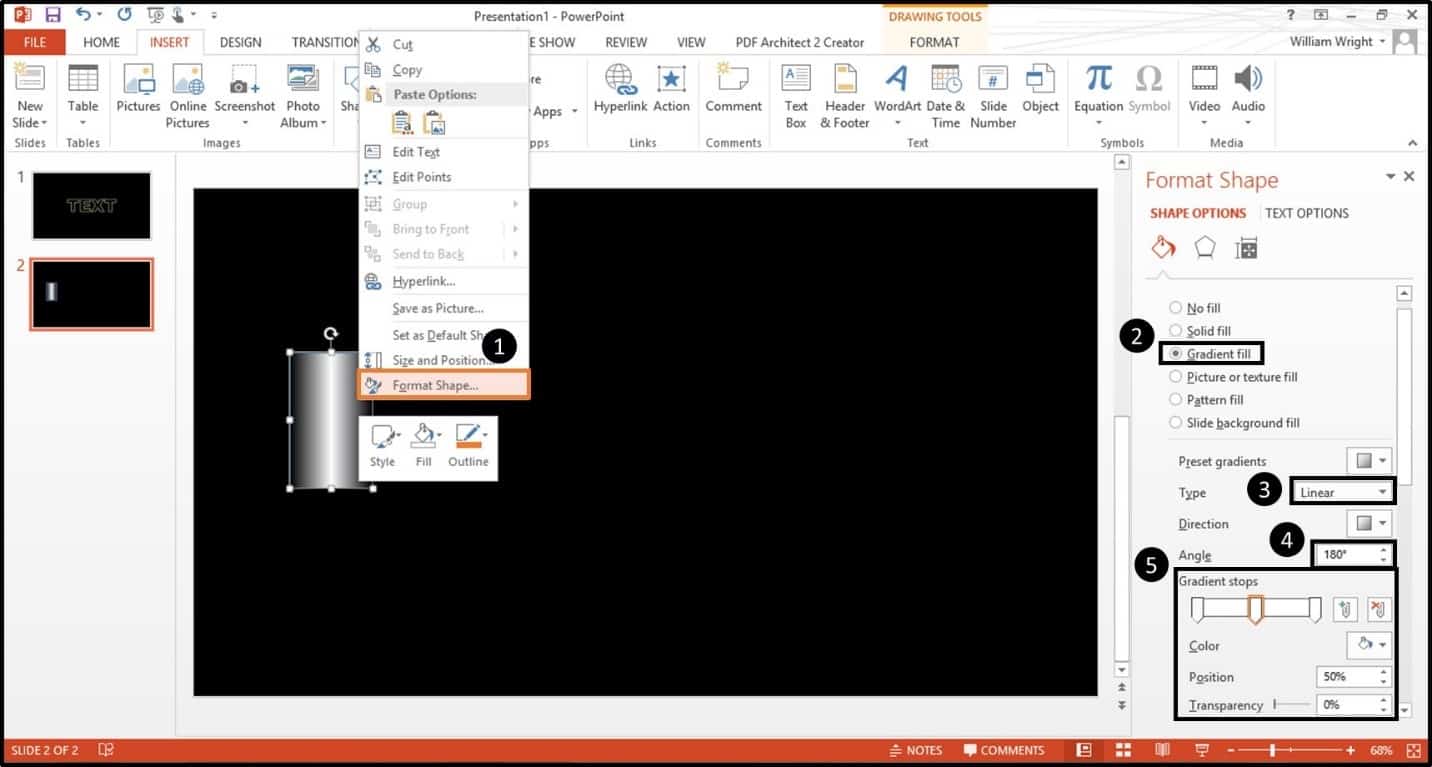 At present remove the shape outline and tilt it forrad slightly. This bar will laissez passer beyond and behind the mask layer to create the effect.
We've now made our mask and looked at different kinds of backgrounds. Allow's put it all together and add blitheness.
1. Blitheness for Video
For the video groundwork it's pretty straightforward. Merely insert the video past going to Insert -> Media -> Video -> Video on my PC.  Crop or shrink the video then that it'southward smaller than your mask, as we're going to want the video to become entirely behind the mask. After this, open up the Animation Pane and make the video playback blitheness Start with Previous and then remove the trigger past selecting the animation and dragging information technology to the top of the Blitheness Pane.
 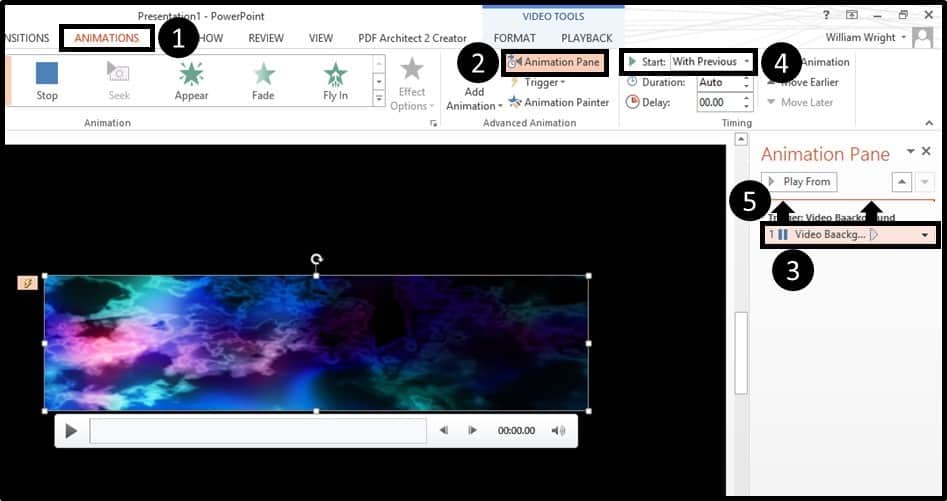 Ok great! Let's copy and paste the mask from before on top of the video. You can come across what it looks like here:
two. Animation for Pictures
Allow's now expect at how to animate the picture show background – again, this is a smashing technique for earlier versions of PowerPoint, in which the video doesn't work in the right style for this trick. Here we use just a regular groundwork flick with some blue dots on it that I got Stockphotosforfree.com, which is the free stock image site I mentioned earlier. One time we've called the picture, there are different animation effects you can add to make it move to make the text come to life – let's but take a await at a few. Some animations that could piece of work well, for example, are Spin, Teeter, and Abound & Shrink. But I'm actually going to make a motion path to the left for this past going to the Blitheness tab and selecting the motion path animation at the bottom. PowerPoint 2013 gives a preview of where the motion path is going to land which is really helpful. 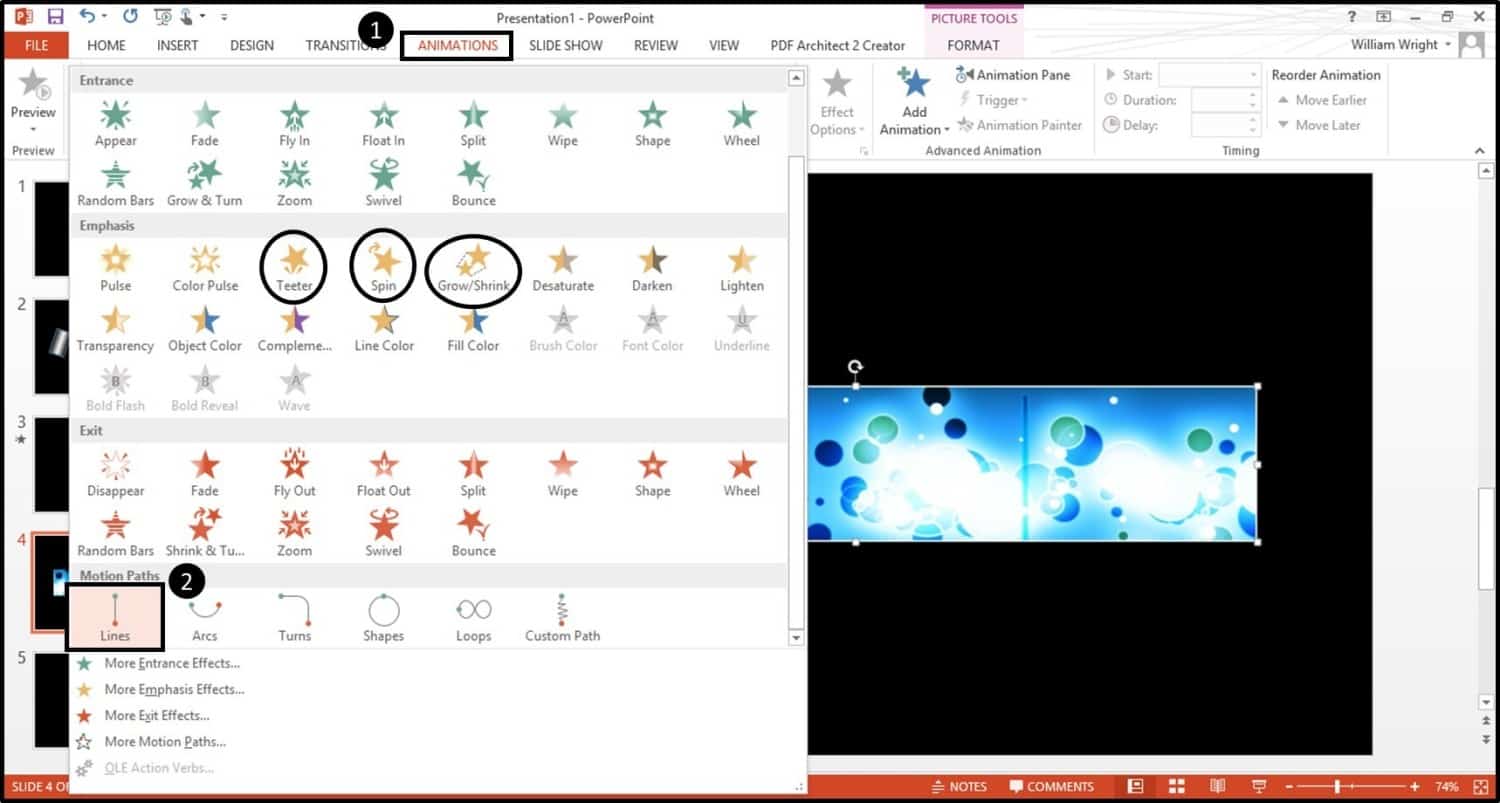 In the Timing section, make it Outset with Previous. So, click on Effect Options and when the menu pops upward, take out Polish Start and Smoothen Finish past dragging the bar to the left. Striking OK. Now we decrease the speed at which the motion path moves by increasing the timing to 5 seconds. Finally, copy and paste your mask again on top of the picture.
 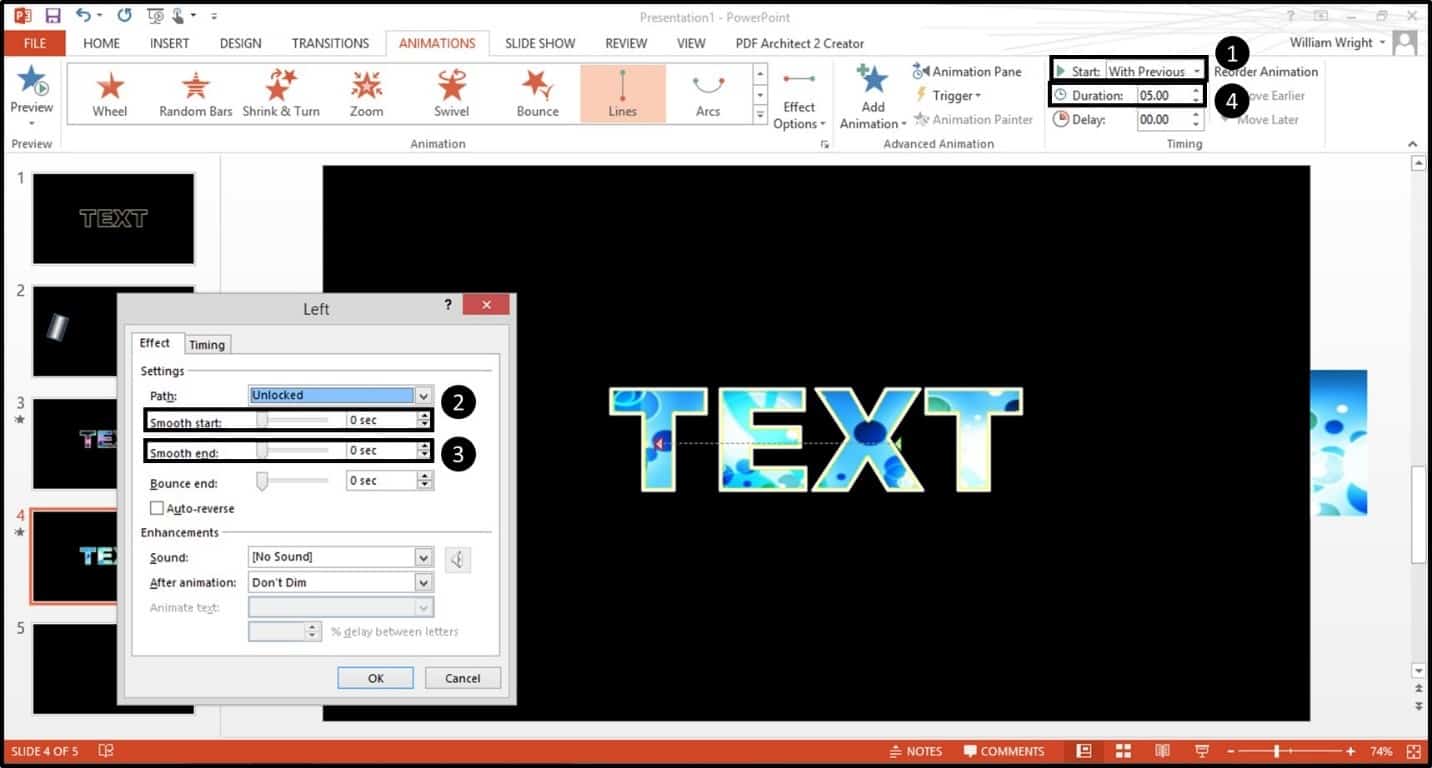 Note: Exist certain to examination it out. If the motion picture went as well far to the left, just make the picture longer by stretching to the left. And now you take your picture background! Be sure to play around with other animation effects on the picture to see what looks coolest.
iii. Creating a shine animation
And now permit's motion to the last background type, which is shine. For the smooth, let'due south start with adding a grayness rectangle in the shape of the mask so that our text will look grey too. I've found that the archetype polish effect is unremarkably done on a grey background, though it can technically exist done on whatever color. 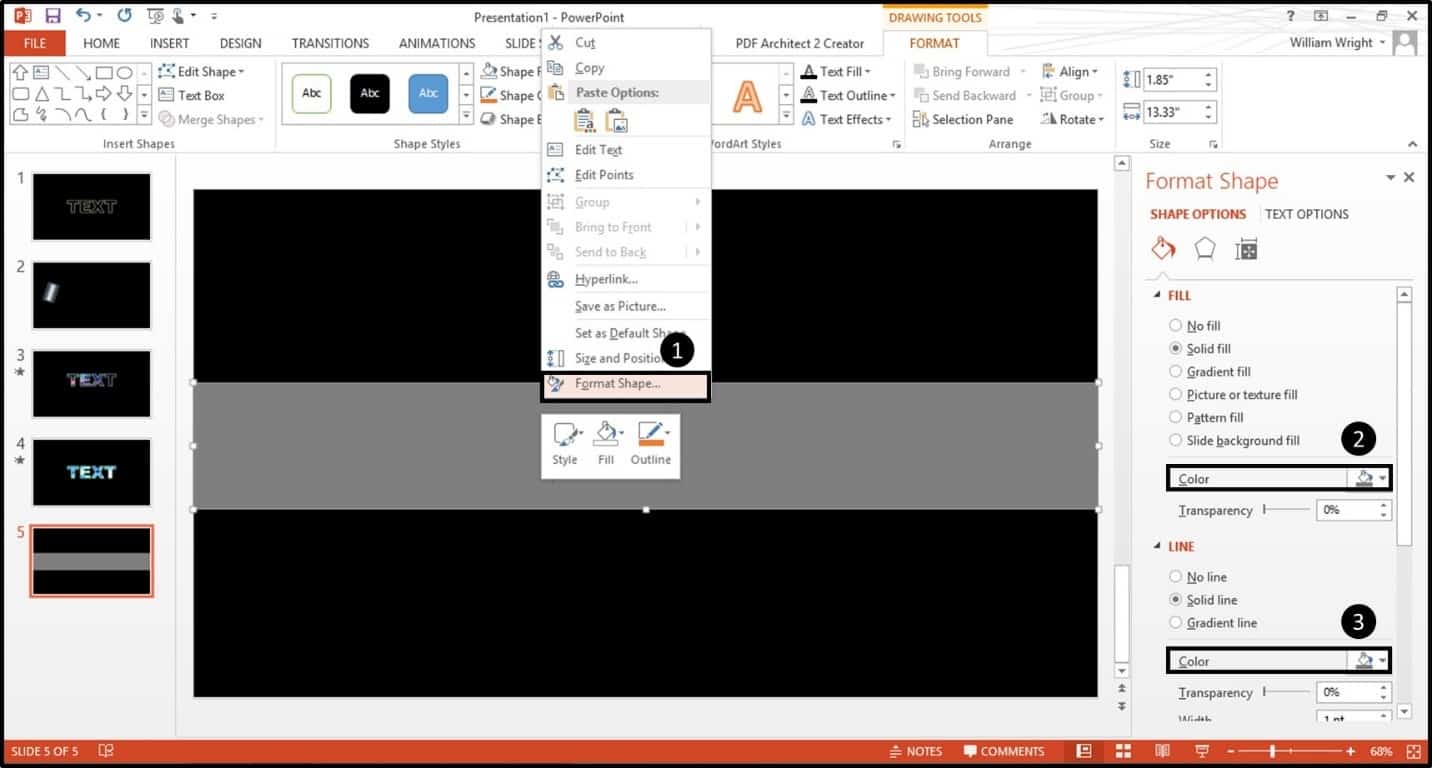 And then add the smooth bar that we made earlier. Stretch information technology out so information technology'due south nice and large, as yous want to make sure that it's long enough to fill the entire text mask.
 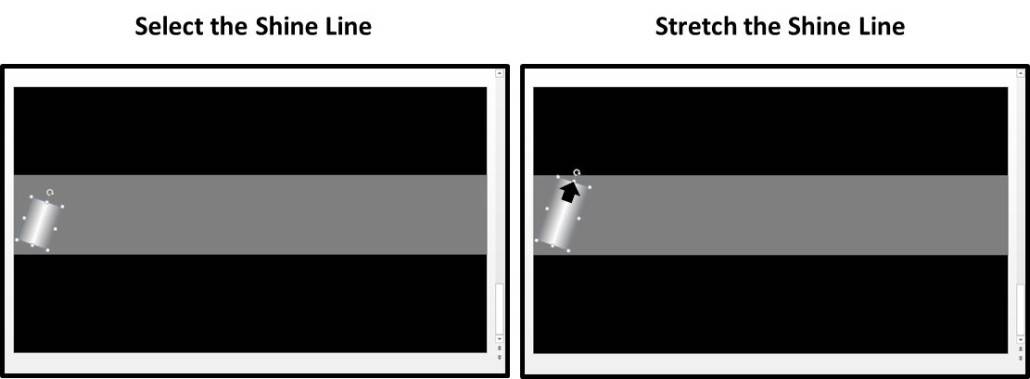 At present allow's re-create and paste the mask layer in hither – note how the polish line is now backside it (you can see the outline of information technology on the left in the graphic beneath). So, let'southward add a motion path to the right so it tin can pass across and behind the text. Again, we get to the Animations tab and select the motion path. Let's change the management to get right.
 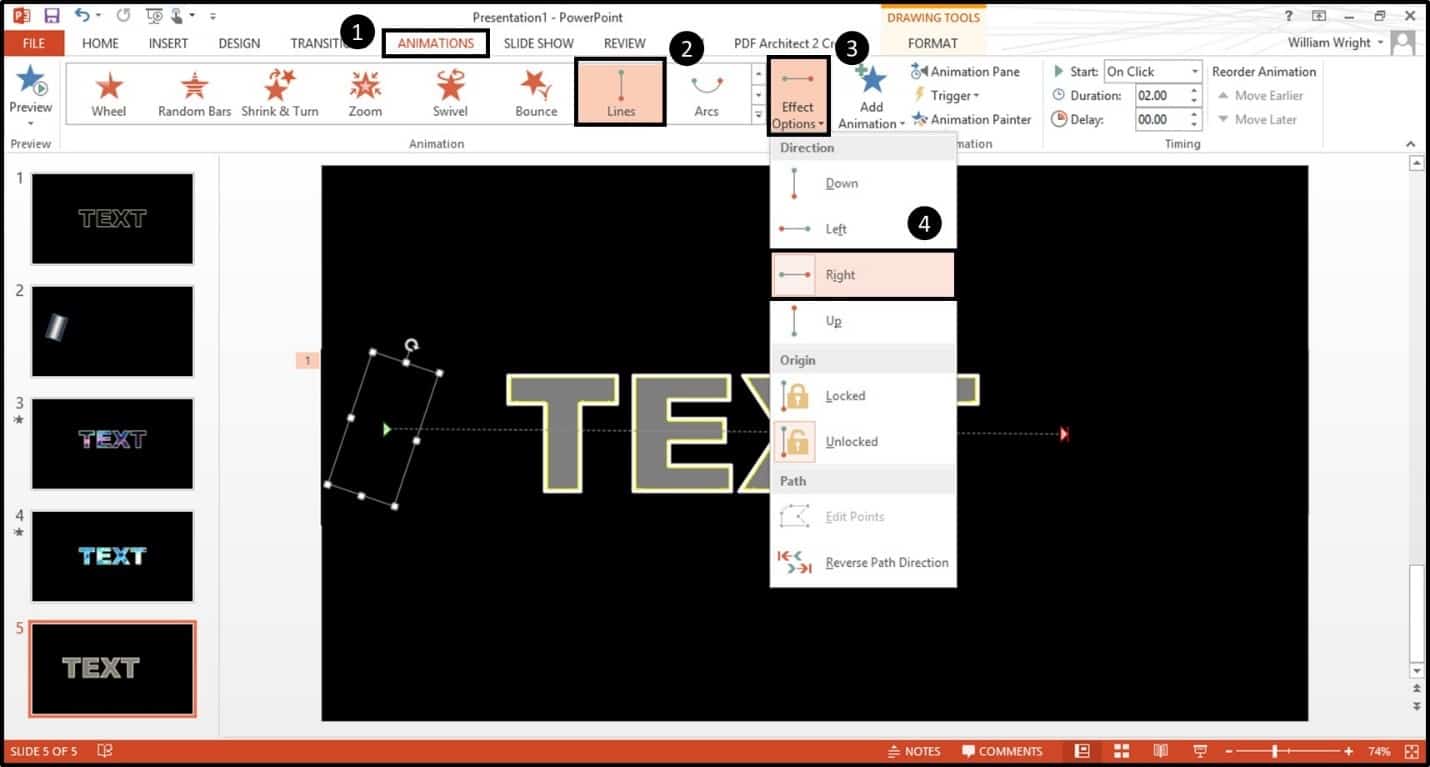 Only as nosotros did before, get rid of the Smooth Start and Polish End by going into Consequence Options. Hit Ok.
 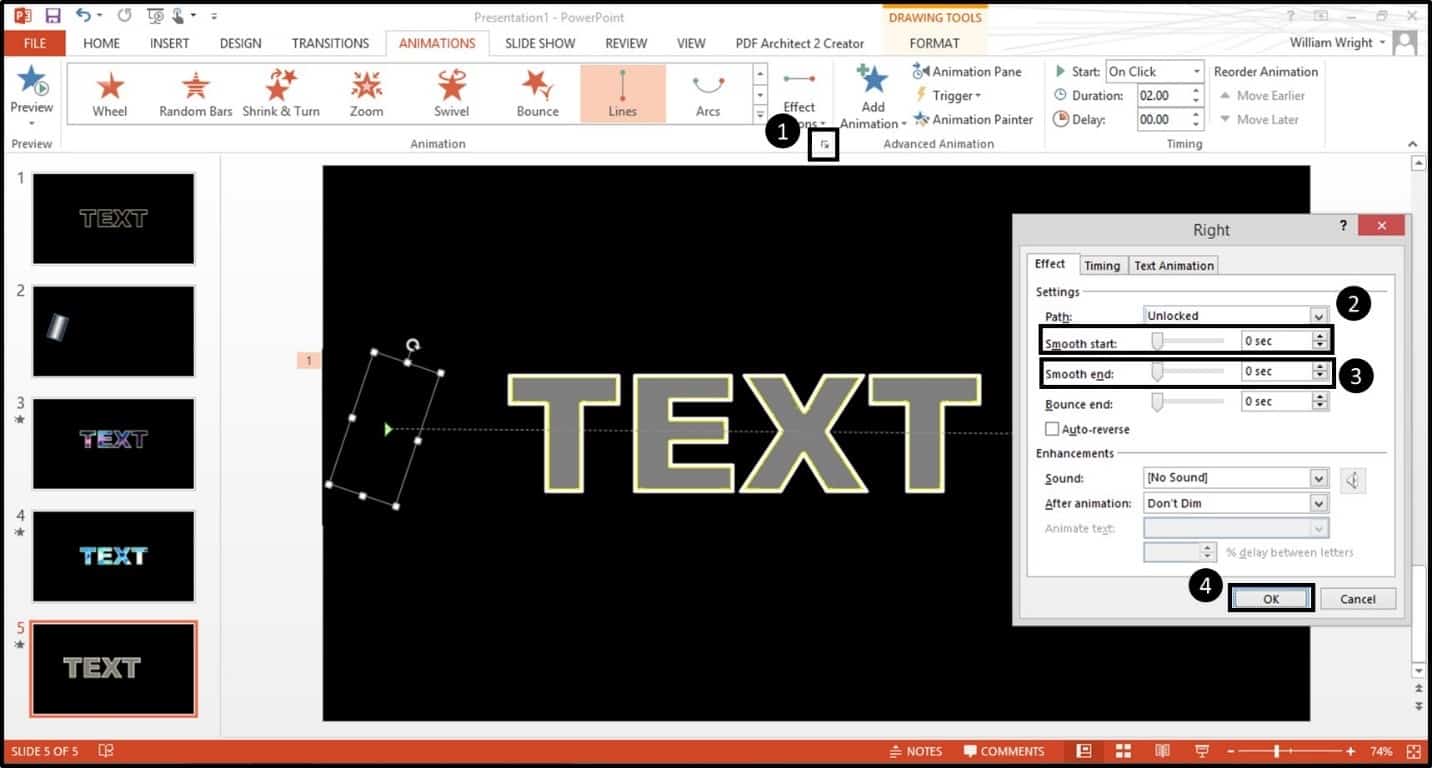 Great, our Polish upshot is now washed! To see what it looks similar, in comparison to the other two, I've put all 3 backgrounds together beneath:
What's Next?
Source: https://nutsandboltsspeedtraining.com/powerpoint-tutorials/motion-text-effect-in-powerpoint/
Posted by: galvanlaideard.blogspot.com
0 Response to "How To Add Animation To Powerpoint Text"
Post a Comment